
Posted by Editorial Team on Nov 20th 2026
Extend Sanding Disc Life: A Shop Guide to Cleaner, Longer-Lasting Abrasives
Last Updated: November 20, 2026
Quick Summary
You extend sanding disc life by fixing the habits that wear discs out early: lower the pressure, run the lowest speed that still cuts, use dust extraction, and store discs flat away from humidity and heat. Clean loaded discs with a rubber stick or brush, but replace glazed or flat discs, since cleaning cannot restore dull grain.
- Clean loaded discs with a rubber cleaning stick or stiff brush; replace glazed discs, which feel smooth and slick.
- Run the lowest speed that still removes material, since heat glazes the grain before the abrasive wears.
- Store discs flat in their original sleeve, away from humidity, sunlight, and heat sources.
- Use the pencil test: if marks barely fade under light pressure, the disc is done.
- Track discs used per job and area sanded to compare true cost per project.
Table of Contents
- Why Sanding Disc Life Matters in a Working Shop
- How to Clean Sanding Discs Without Damaging the Abrasive
- Preventing Abrasive Loading Before It Starts
- Signs of Worn Out Sandpaper and When to Replace the Disc
- Tool Settings, Heat Management, and Storage That Add Disc Life
- Choosing the Right Abrasives for Your Shop
- Frequently Asked Questions
Why Sanding Disc Life Matters in a Working Shop
Sanding disc life is the usable cutting time you get from an abrasive before the grain stops removing material.
Most shops lose sanding disc life for reasons unrelated to the abrasive itself. Pressure, heat, dust, and storage all wear a disc down early; fix those habits and the same box lasts noticeably longer.
How to Clean Sanding Discs Without Damaging the Abrasive
Cleaning a sanding disc means lifting packed dust and metal particles out of the abrasive grain so the cutting edges stay exposed. Done right, the disc keeps biting; done wrong, you tear the grain off the backing.
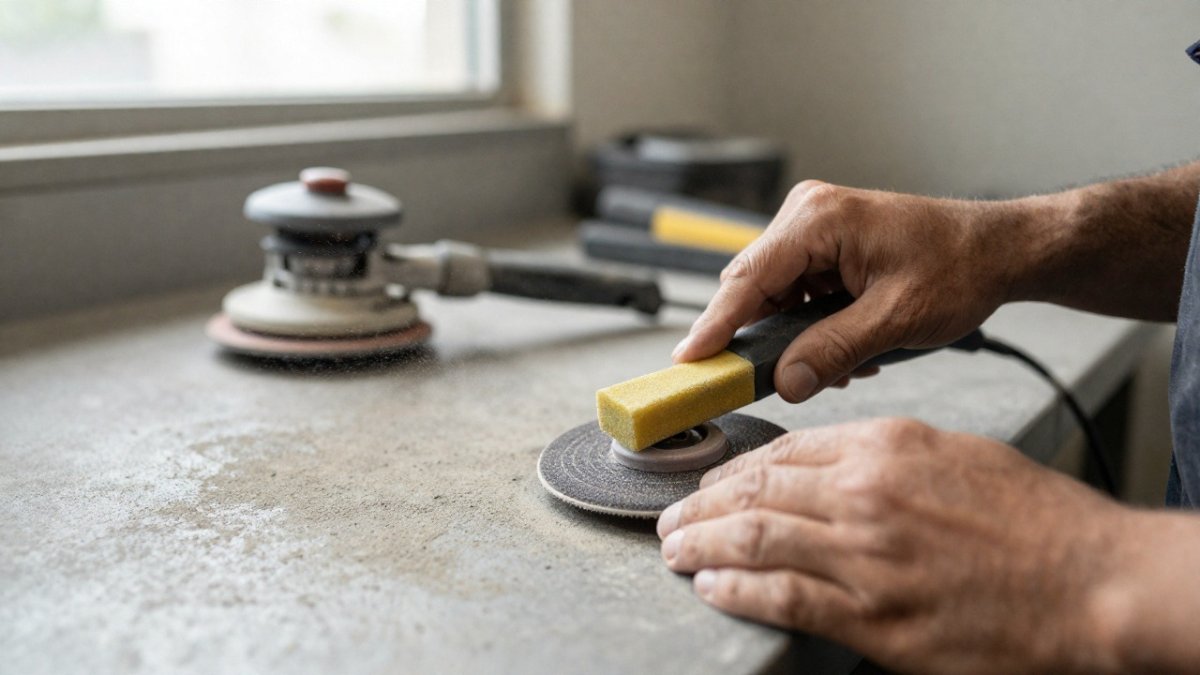
Here is a common cleaning routine:
- Pull the disc and knock off loose dust with a light tap.
- Press a rubber cleaning stick against the spinning disc at low speed, or scrub a hand-held disc across the stick.
- Work in short passes and let the stick pull the loading out of the grain.
- Blow off remaining dust with low-pressure air, away from your face.
- Check the surface. If the grain looks shiny and flat, cleaning will not bring it back.
Cleaning Methods by Disc Type
Hook-and-loop discs clean best with a rubber stick or stiff nylon brush.
Adhesive-backed discs need a gentler touch. Use a brush, never soak them, and store them flat so the backing stays true.
Sanding belts take a cleaning stick well while running.
Wet sanding discs should be rinsed in clean water and dried flat. Skip the stick, since wet paper tears easily.
Preventing Abrasive Loading Before It Starts
Abrasive loading is the buildup of dust, resin, and metal that packs into the grain and stops the disc from cutting. Prevention beats cleaning every time.
- Use dust extraction whenever the tool allows it.
- Match the grit to the job; jumping to too fine a grit too early packs the surface fast.
- Lower the pressure. Forcing the disc creates heat, and heat turns dust into a hard glaze.
A common mistake is running one disc across every stage of a job. Fresh, correctly matched abrasives load less and cut cooler.
Signs of Worn Out Sandpaper and When to Replace the Disc
Replace a disc when it stops cutting, not when it looks dirty. The hard part is telling a loaded disc that can be cleaned from a worn disc that cannot.
Reading the Symptoms: Loading Versus Glazing
Loading and glazing look similar from a distance but behave differently:
- Loading is packed dust, resin, or metal smeared into the grain. The surface feels rough and clogged, and the disc may look fuzzy or blotchy. Loading is usually cleanable with a rubber stick or brush, and the disc often returns to cutting.
- Glazing is a shiny, glassy, hardened layer over the grain, usually caused by heat. The surface feels smooth and slick rather than rough. Glazing is not cleanable in most cases, because the cutting edges are covered or dulled, not just blocked.
- Tearing or shedding grain shows as bare patches on the backing or a disc that suddenly cuts unevenly. This is physical damage, often from too much pressure, a snag, or cleaning with a sharp tool. Replace the disc.
Clear Replacement Criteria
Use these tests to decide whether to clean or replace:
- The pencil test. Mark the surface lightly and sand. If the marks disappear at a normal rate with light pressure, the disc is still cutting. If you have to press hard or the marks barely fade, the disc is done.
- The feel test. A working disc feels sharp and gritty. A glazed disc feels smooth and glassy. A loaded disc feels rough but clogged. Clean a loaded disc; replace a glazed one.
- The heat test. If the disc heats up quickly at normal speed and pressure, the grain is dull and friction is doing the cutting. Replace it.
- The surface test. A polished or burnished surface instead of a scratched one means the disc is no longer cutting. Replace it.
- The one-clean rule. If cleaning restores cutting, keep going. If the disc loads again almost immediately, the grain is worn and the disc should be replaced.
Cleaning buys time, but it cannot restore dull grain. Once the abrasive is glazed or flat, a new disc is cheaper than the extra time, heat, and surface damage that come from forcing a worn disc.
Measuring Whether a Disc Is Worth Its Price
Compare discs by cost per project or per area sanded:
- Track how many discs a job consumes, not just what a box costs. Cost per square foot sanded can differ from purchase price, so compare discs on total usage.
- Note how often you stop to clean or change discs. Time spent changing discs is a real cost, and a disc that holds its cut longer reduces it.
- Watch for hidden costs of cheap discs: more heat, more surface damage, and more rework.
Loading and glazing look alike but call for different responses, so use these symptoms to decide whether to clean or replace.
| Symptom | What it looks like | What to do |
|---|---|---|
| Loading | Packed dust, resin, or metal; feels rough and clogged | Clean with a rubber stick or brush |
| Glazing | Shiny, glassy, hardened layer; feels smooth and slick | Replace the disc |
| Tearing or shedding grain | Bare patches on backing; cuts unevenly | Replace the disc |
| Uneven wear | One edge worn flat while the rest still cuts | Fix technique or pad |
| Curled or slipping backing | Disc does not sit flat; wobbles | Replace disc and check storage |
Tool Settings, Heat Management, and Storage That Add Disc Life
Speed and heat decide how long a disc lasts, and the two are linked. Every increase in RPM raises friction at the grain tips, and friction turns dust and resin into a hard glaze that blocks cutting edges. Aim for the lowest speed that still removes material at an acceptable rate, with enough pressure to keep the grain engaged but not enough to burn the surface.
Setting Speed and Pressure by Material and Disc Type
There is no single correct dial setting, but there are reliable starting points. Use these as baselines and adjust from what you see and feel:
- Random orbital sanders on bare wood: run at a moderate speed and let the tool's orbit do the work. Bear down only enough to keep the pad flat. If the disc chatters or the pad stops spinning freely, you are pressing too hard.
- Random orbital sanders on paint, primer, and clear coat: lower the speed and use light pressure. High speed plus heavy pressure heats the coating, softening it and driving it into the grain, the most common cause of loading on automotive work.
- Angle grinders and disc sanders on metal: speed matters more here because the abrasive needs surface speed to cut. Keep the disc flat and move steadily; dwelling in one spot concentrates heat and glazes the grain quickly.
A useful habit is to mark the workpiece lightly with pencil and sand until the marks disappear. That tells you when the disc has done its job, so you stop sanding a finished surface and stop heating a disc with nothing left to cut.
Watch out: running a disc at maximum speed with heavy pressure feels productive but usually shortens disc life more than any other habit, because the heat glazes the grain before the abrasive is worn.
Managing Heat on the Disc and the Work Surface
Heat builds in three places: the grain tips, the backing, and the workpiece. You can manage all three:
- Keep the disc moving. A steady, overlapping motion spreads heat across the abrasive instead of concentrating it in one zone. Stopping the tool on the surface, even briefly, is the fastest way to burn a disc.
- Let the tool cool between heavy passes. On long sessions, especially with fine grits, pause and check the disc temperature with the back of your hand near (not on) the surface. A disc that feels hot is already losing cutting efficiency.
- Match the backing to the heat. Paper backings tolerate heat less well than film or cloth. For heat-heavy work such as metal grinding or heavy stock removal, film or cloth backings are generally a better match than paper.
Storage That Preserves Backing and Grain
Storage problems show up as curled backing, slipping hook-and-loop, and discs that wobble and wear unevenly. Keep these rules:
- Store discs flat, in their original sleeve or a closed container, so the backing stays true and the grain is not crushed.
- Keep them away from humidity and temperature swings. Damp air softens adhesive and curls paper backing, and a curled disc will not sit flat and will wear on one edge.
- Keep hook-and-loop backing clean. Dust on the loop side reduces grip, and a slipping disc wobbles, wearing the grain unevenly and potentially damaging the pad.
Busy shops often blame the abrasive for short disc life when the real cause is a hot, fast tool and a disc stored in a damp corner. Fix the settings and the storage, and the same box of discs lasts noticeably longer.
Choosing the Right Abrasives for Your Shop
Matching the abrasive to the job generally improves cut quality and disc life. Match the grit to the sanding stage: coarse for material removal, mid grits for surface preparation, fine grit for finishing.
For automotive sanding, choose discs built for the material and the tool. For wood, pick a grain that clears dust well. Expert guidance is available to help match the disc to the job.
A two-bay shop cannot afford to swap discs mid-job.
Frequently Asked Questions
How long should a sanding disc last?
There is no fixed number, because sanding disc life depends on grit, material, pressure, tool speed, and how well you manage dust and heat. A disc used on soft wood with light pressure and good dust extraction can keep cutting far longer than one forced across metal at high speed. Watch cutting performance rather than the clock: when a disc needs noticeably more pressure to remove material, or you see glazing and loading that cleaning will not fix, it is done.
How can I tell if a sanding disc is worn out or just clogged?
Clogged discs look packed with dust, resin, or paint residue, and the abrasive grain is still visible underneath. Clean it with a cleaning stick or compressed air and test the cut. A worn disc looks glazed or shiny, the grain feels smooth to the touch, and cleaning does not restore cutting performance. If the backing is torn, the hook-and-loop face is matted, or the disc no longer sits flat, replace it regardless of how much abrasive is left.
Does the pressure applied during sanding affect disc longevity?
Yes, significantly. Forcing the tool drives abrasive grain into the work surface, generates friction and heat buildup, and breaks down the grain faster. Let the disc cut at its own rate with light, even pressure and keep the tool moving. If you find yourself leaning on the sander to remove material, drop to a coarser grit instead. Correct pressure also keeps the disc aligned flat, which reduces uneven wear across the face.
Is it cost-effective to clean sanding discs versus replacing them?
For many shops, cleaning is worth considering before replacing a loaded disc. Cleaning also cuts downtime, which matters in a two-bay shop swapping discs mid-job. Replace rather than clean when the disc is glazed, the backing is damaged, or cleaning no longer improves cutting performance. Track how many discs you burn through per week to see the real savings.
